How do I check and change the ink coverage?
Checking the ink coverage is not a waste of time. An ink coverage that is too high may cause the print on your product to become "too wet" after printing, which can make it stick to other products. An ink coverage that is too low can result in the print not being visible, or being technically impossible to print. To check the exact minimum and maximum ink coverage for your product, you should consult the design guidelines for your product.
Check ink coverage in Adobe Photoshop
Check a specific position
To check the ink coverage at a specific position, you can click on the desired position with the color picker and read the color values in the color tab. Below we see the color composition for pure yellow (CMYK 0, 0, 100, 0). Here, the ink coverage is 100%. The ink coverage is calculated by simply adding the four CMYK values.
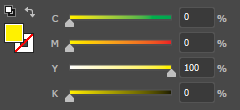
Figure 1: the color composition of pure yellow
This technique is good for some random tests, but checking each color shade this way is not feasible. Luckily, you can have Adobe Photoshop or Adobe Acrobat do the work for you.
Check complete file
In Adobe Photoshop you can set a customized maximum ink coverage. This way you can prevent too much ink. You can also use it to reduce ink coverage in all places with excessive ink coverage.
Step 1: open file and choose color mode
Open the document in Adobe Photoshop and ensure that the file is in the correct color mode (CMYK). More information about different color modes.
Step 2: color settings
Go to edit > color settings or use the key combination Shift + Ctrl + k. When the screen pops up, select the custom CMYK option in CMYK, as shown in figure 2.
Step 3: set the maximum ink coverage
Finally, set the maximum ink coverage to the desired limit. In this case, we take 280%. You can also enter the maximum key value or black value, for this you should use 100%. In figure 3 both fields are indicated.
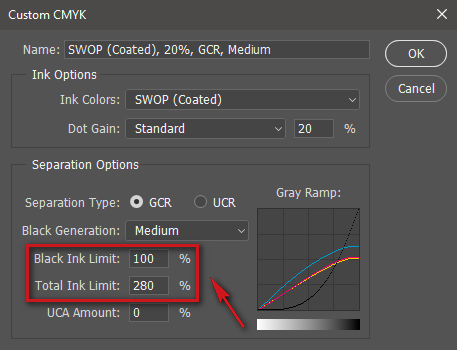
Figure 3: the maximum ink coverage and maximum key value
Note: this will automatically adjust the colors to meet the specified limits. This can result in unexpected results!
Check ink coverage in Adobe Acrobat
You can also use Adobe Acrobat (not to be confused with Adobe Reader) to check the ink coverage of your entire file or a specific position. The check is very simple to perform in just a few steps.
Step 1: open your file
This step does not really require a lot of extra information. The only thing that matters is that you use Adobe Acrobat, not Adobe Reader.
Step 2: open the output preview
When you have opened your file, you will see different tools on the right. See if the "print production" tool is here. If not, go to tools > protection & standardize. Drag the icon with print production to the bar on the right. Choose "output preview" after opening this tool.
Step 3: setup the output preview
In the window that has just opened (see figure 4), change your "preview" to "separations".
Step 4: check the ink coverage
To check the entire file check "Total coverage area" at the bottom and adjust the maximum amount of ink to the desired level. Once you have done that you will notice that in all places where the ink coverage is too high, the image is replaced by the selected color (in our case green).
To check a specific position move your cursor over the desired area; in the large white area of figure 4 the color composition will be displayed.
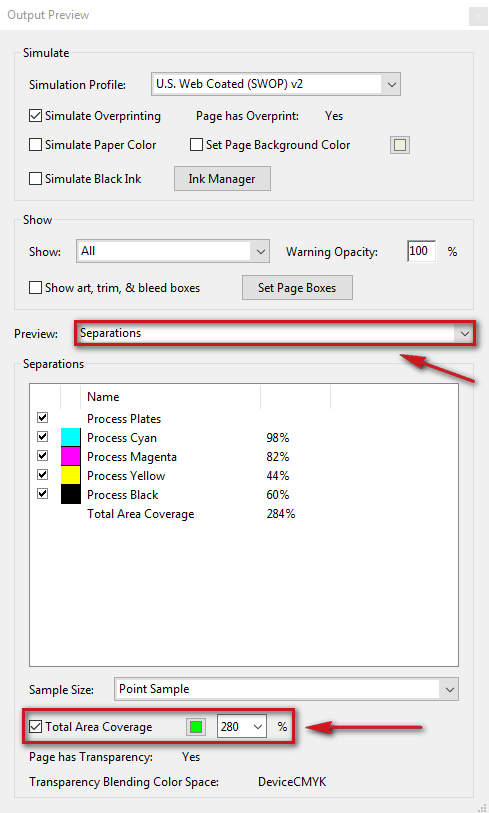
Figure 4: The output preview settings to check the ink coverage

